Keen to know about events and organisations in our region?
Please take a look around our site to find events, groups and organisations, and articles about sustainability and sustainable living across Southern NSW and North East Victoria. The site highlights opportunities across the region, including Albury/Wodonga.
Consider joining our email newsletters list to stay in the loop We send event alerts once a week, at the start of each month, and when new Living Lightly articles are published. If you’d like any of those, pop over to add your email address and preferences on this page.
How to add your event or group to Ecoportal
We warmly welcome contributions to these listings. This site offers a hub to access information and we celebrate the many and diverse groups, organisations and events that are contributing to opportunities to learn, connect with others, to make positive change and strive towards a bright future. Content contributors are encouraged to create a log in, so you can manage your event or group listings. See below for more details and a how-to.
Events posted by logged-in users will be published immediately. Events posted by guest users will be reviewed by site volunteers before being published.
Fill out the Event Submission Form with your Event Title, Event Description and select the time and date of your event.
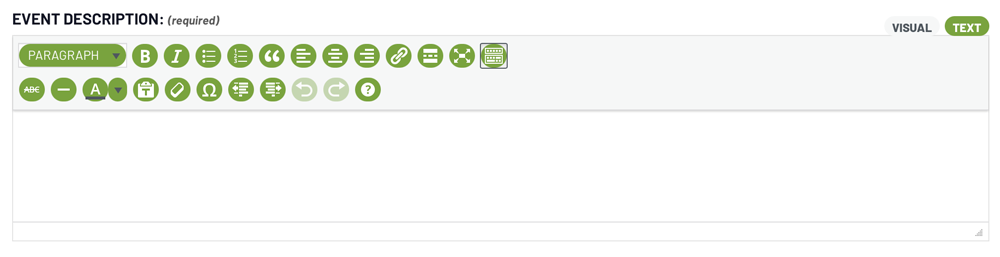
When adding your event description you may choose to use the built-in editing tools to highlight content by making it Bold, italic, adding bullets or hyper links etc. By hovering over the little round green buttons it will display what each one does.
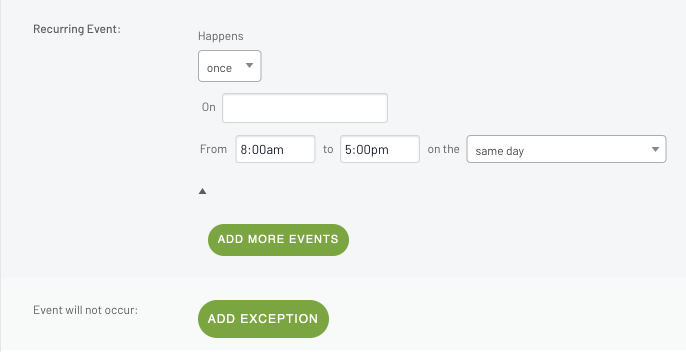
If the event is recurring (eg. monthly meeting), click on the green Schedule Multiple Events button to open the recurring event options.
You can select the frequency (daily, weekly, monthly, yearly etc), pattern and time. If your event will skip a recurrent date because of holidays or similar, just click on the green Add Exception button and you can select which dates it will NOT occur.
Add your Event Image by clicking on the grey Choose Image button. This will connect to the file directory on your device, where you can navigate to the image you’d like to upload.
Due to the volume of user-uploaded images, Ecoportal has an image size restriction of 512kb. It’s a good idea to resize your image to an appropriate size before uploading. You can use free online image resizing programs such as Adobe Express to do that. Generally making your image 1000px wide (for both landscape & portrait images) will display well on the website.
Add your Event Category. If you click in the search from existing categories dialogue box, you’ll see the current categories appear. You can select more than one category for your event, just click on one category at a time.
You can add Event Tags in the same manner as the categories.
The Event Status will default to Scheduled (for upcoming events), but if you are editing an existing event you can change this status to postponed or cancelled if appropriate.
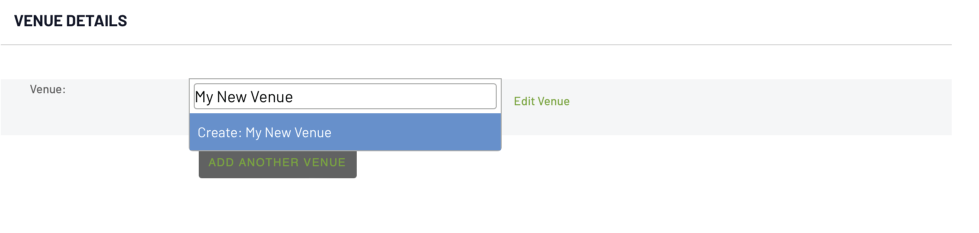
Add your Venue Details by clicking in the Create or Find Venue dialogue box. As with the event categories and tags, you’ll see a list of existing venues which you can select from. If your venue is not on the list you can add a venue by typing in the name of your new venue and then click on the blue Create: button that appears. You will now see options to add address, phone and website for the venue. Please note: To keep things simple for all users, please only add new venues if you anticipate the venue will be used regularly. For less common venues or locations, you can select the Check the event description for venue details option on the list of venues, then just include the venue address etc in the event description. Also, any venues you may have added to Ecoportal previously will appear first on the list, if you scroll down you will see the remaining list of venues.
Add your Organiser Details by clicking in the Create or find Organiser dialogue box. As with the venues, if your organiser is not on the list you can add a new organiser by typing in the name of your new organiser and clicking on the blue Create: button that appears.
If you are adding a new Organiser that already has a profile within the Groups on Ecoportal, please add the URL link to their Group page on Ecoportal (which has full group info and contact details) instead of adding contact information on their organiser page. This will avoid double ups of information and reduce the number of areas that need updating when group details change.
Add the Event Website link if needed for event tickets, bookings or RSVPs.
If there is an Event Cost for tickets you can add that in the last form field. Leave as is if it is a free event.
Once you are happy with all of the details entered, you can click on the big Submit Event button at the bottom of the page.
Remember: If you have registered and logged in your event will be published immediately. If you need to edit your event you will be able to access that from your My Ecoportal dashboard.
Groups posted by logged-in users will be published immediately. Groups posted by guest users will be reviewed by site volunteers before being published.
Upload your Group Logo, by clicking on the green Upload Image button. This will connect to the file directory on your device, where you can navigate to the image you’d like to upload.
Due to the volume of user-uploaded images, Ecoportal has an image size restriction of 512mb. It’s a good idea to resize your logo to an appropriate size before uploading. You can use free online image resizing programs such as Adobe Express to do that. Generally making your logo 1000 px square will display well on the website.
Fill out the Group Namewith your official name. Include any abbreviations or acronyms that people might use to search for your group.
Add a Group Description. Include details like who are you & what do you do, how can people get involved etc.
Select the Group Categories that best relate to your group. You can select multiple categories.
Add your group contact details including the best Contact Person, Website (or social media page) if you have one, Email & Phone if appropriate. Please note: these will appear on your group pages so please avoid including private emails and phone numbers.
Once you’re happy with the details you have entered, click the green Submit Group button at the bottom of the form.
Remember: If you have registered and logged in your group will be published immediately. If you need to edit your group you will be able to access that from your My Ecoportal dashboard.